

Avaya Session Manager SIP Trunk Configuration
January 18, 2026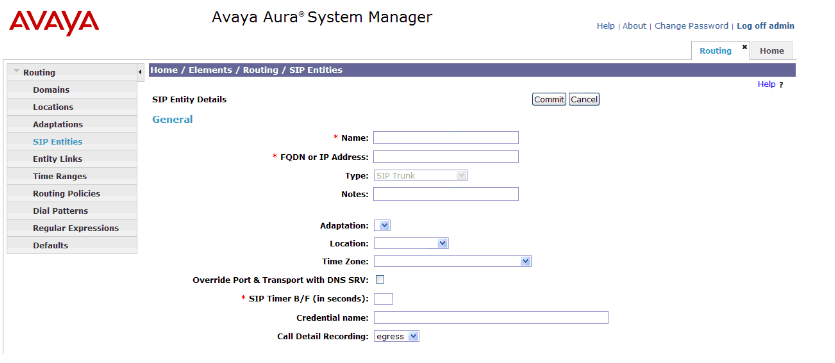
Avaya SIP Trunking
This guide explains the steps to configure a SIP Trunk between Avaya Session Manager and Comstice SIP SBC in order to integrate Comstice solutions such as Comstice Outbound Dialer, Avaya Agent Portal, Comstice Salesforce Webphone, and AI Voice Assistant into your Avaya Telephony system.
Step 1: Configure SIP Entity for the SBC
Login to Avaya Aura System Manager and navigate to Routing > SIP Entities. Create a new SIP Entity with the following parameters;
- Name: Comstice SBC01
- FQDN or IP: Comstice_SBC_IP_Addr
- Type: Other
- Location: Main
- Time Zone: US East
Step 2: Configure Entity Link
Navigate to Routing > Entity Links. Add a new Entity Link between Avaya Session Manager and Comstice SBC SIP Entity.
- SIP Entity 1: SessionManager
- Port 1: 5060
- SIP Entity 2: Comstice SBC01
- Port 2: 5060
- Transport: TCP
- Trusted: Enabled
Step 3: Configure SIP Domain
Navigate to Routing > Domains. Add your SIP domain if not already configured. This domain is used in:
- Request-URI
- From headers
- Registration
- Routing policies
Step 4: Configure Locations
Navigate to Routing > Locations. Create locations for:
- Session Manager
- Comstice SBC
Bandwidth management can also be configured here.
Step 5: Configure Routing Policy
Navigate to Routing > Routing Policies. Create a policy for calls destined to the SBC.
- Name: To_ComsticeSBC
- SIP Entity as Destination: Comstice_SBC01
- Time of Day: Default
- Cost: 1
Step 6: Configure Dial Patterns
Navigate to Routing > Dial Patterns. Add patterns to route calls to the SBC.
| Pattern | Min | Max | Routing Policy |
|---|---|---|---|
| 9 | 10 | 10 | To_Comstice_SBC |
| + | 11 | 15 | To_Comstice_SBC |
Examples;
- 9NXXNXXXXXX
- E.164 routing
Step 7: Configure SIP Trunk in Communication Manager
If using Avaya Communication Manager; Access SAT terminal. Add Node Names using this command;
change node-names ip
- Session Manager
- Comstice SBC
Add SIP Signaling Group
add signaling-group 10
Typical Configuration;
| Field | Example |
|---|---|
| Group Type | sip |
| Near-end Node Name | procr |
| Far-end Node Name | company.com |
| Far-end Domain | company.com |
| Transport Method | tcp/tls |
| Direct IP-IP Audio | y |
Add Trunk Group
add trunk-group 10
Typical Configuration;
| Field | Example |
|---|---|
| Group Type | sip |
| TAC | 1010 |
| Service Type | tie |
| Signaling Group | 10 |
| Number of Members | 20 |
| Direct IP-IP Audio | y |
Step 8: Configure Codec Sets
In Communication Manager:
change ip-codec-set 1
| Priority | CODEC |
|---|---|
| 1 | G.711MU |
| 2 | G.729A |
Step 9: Configure Trusted SIP
If using TLS import certificates into; System Manager, Session Manager, Comstice SBC.
Troubleshooting Commands
On Session Manager, use the following options;
- traceSM
- SIP logs
- /var/log/messages
On Communication Manager, use the following commands;
status trunk 10status signaling-group 10list trace tac 1010list trace station xxxx