Comstice Quartz
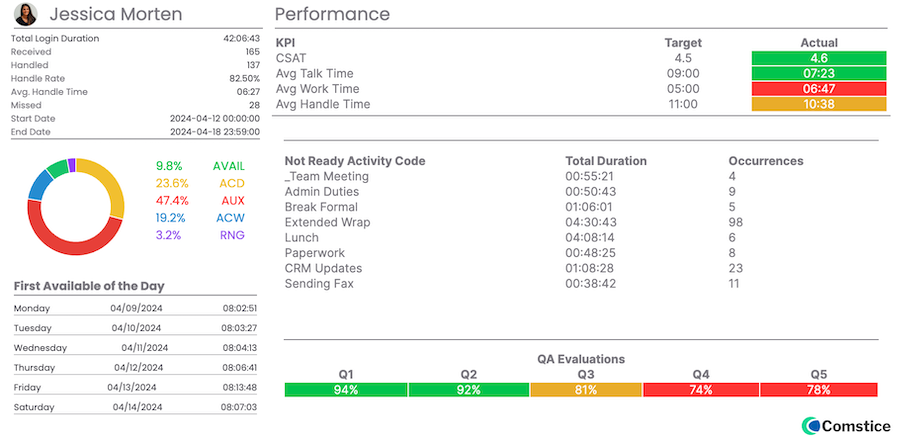
Comstice Quartz solution offers real-time dashboard, historical reporting and workforce management modules. It integrates with Avaya CMS and retrieves the real-time and historical data. Here are the configuration steps to configure Avaya CMS for RT_Socket real-time interface, External Call History Interface and ODBC integration;
- Create a new Avaya user with read_only database access
- Configure Avaya CMS External Call History Interface
- Configure Avaya CMS RT Socket Feed
Avaya ECH Benefits
You can use Avaya ECH data to access many features including;
- Cradle to Grave reports
- Having a conversation with your Avaya Call Center data using Large Language Models (ChatGPT and offline LLMs that you can run on-premises)
- Analyzing Customer Journeys to optimize menu options
- Reporting Audio Quality
- Repetitive Calls Analysis
- Customer Patience Analysis
Configuration Steps
Avaya External Call History data will be transferred to another server such as Comstice Quartz using SFTP for creating detailed reports. For this, we will create an SSH key on Avaya CMS to login to Comstice Quartz to copy Avaya ECH files.
Onec the data files are copied, we will convert ECH files into a machine-readable format and save them into a PostGreSQL database running locally.
Enable Avaya External Call History Interface
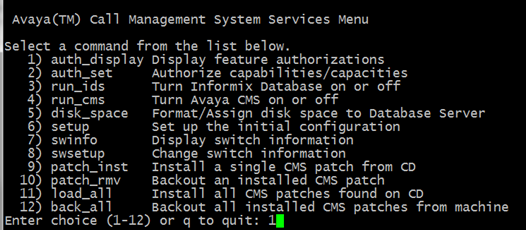
Create an SSH session into Avaya CMS CLI, login as root and run "cmssvc", then select option 1.
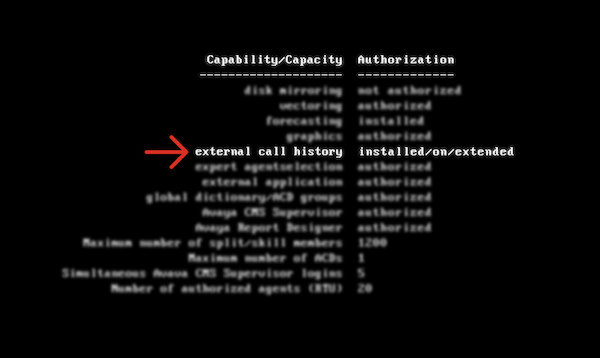
Verify that External Call History line is marked as "authorized" or “installed/on/extended” depending on your CMS version.
Avaya CMS R21: For this version, please check whether /opt/Avaya/cmsconnector/ech/ech.conf file exists.
Creating an SSH Key
Logon to Avaya CMS via SSH cli using an administrative account such as cmssvc then type the command below;
ssh-keygen -t rsa -f /cms/dc/chr/comstice_echi.key
This wil create a private and a public key. We will use the public key in the Comstice Quartz Reporting Server. Run the command below and copy the public key starting with ssh-rsa;
cat /cms/dc/chr/comstice_echi.key.pub
Testing Avaya ECHI Data Transfer
We will test the ssh connection from Avaya CMS server to Comstice Quartz Reporting Server using the public key we copied. First, add Comstice Quartz Reporting Server hostname into CMS hosts file
vim /etc/hosts
Add the following line after you modify the hostname and the IP address for your environment;
10.2.1.2 comstice-quartz
Select yes to continue and run the ssh-keygen command below and press enter twice to skip passphrases;
ssh-keygen -t rsa -f /cms/dc/chr/comstice_echi.key
This command will create a private and a public key. Public key (ending with .pub) needs to be saved on the Comstice Server. Enter the command below to reveal the public key on the command line and save it to a text file;
cat /cms/dc/chr/echi.key.pub
Comstice will help you to upload this public key on your Comstice Quartz Reporting and Analytics solution. You can test the SSH connectivity from CMS CLI using the command below;
ssh -l echi -i /cms/dc/chr/comstice_echi.key quartz.yourcompany.com
Configuring Avaya ECHI for SFTP
On Avaya CMS Server, open the ech.conf file as below;
vim /export/home/pserv/ech/ech.conf
For Avaya CMS R21, open the ech.conf file as below;
vim /opt/Avaya/cmsconnectors/ech/ech.conf
Go to the section titled as;
### Second Explorer/Analyzer or ISM data feed configuration items ###
Here, you can enter the SFTP settings as below;
ISM_READY=yes            # Is there a second Explorer/Analyzer or an ISM?
ISM_XML=no               # The second binary feed is to Analyzer?
ISM_SYNONYMS=no          # The second binary feed is to Explorer2?
ISM_EXPLORER1=no         # The second binary feed is to Explorer1?
ISM_HOST_NAME=comstice-quartz # must be in /etc/hosts
ISM_USER_ID=comstice_echi  # FTP user ID
ISM_USER_PW=C0mst1c3123    # FTP user password
CD=no                    # Normally 'yes'.  But if we are sending to a system
                         # where we do NOT need to 'cd' to another directory,
                         # make this 'no'.
ISM_SSH=yes              # If 'yes', use 'sftp' instead of 'ftp'.
You can also use the ASCII templates;
ASCII_HOST_NAME=comstice-quartz # must be in /etc/hosts
ASCII_USER_ID=comstice_echi  # FTP user ID
ASCII_USER_PW=C0mst1c3123    # FTP user password
ASCII_FOLDER=/home/comsticesftp
ASCII_SSH=yes              # If 'yes', use 'sftp' instead of 'ftp'.
Decoding Avaya ECHI Data
Avaya ECHI data files are in binary format and they are not human-readable. Comstice Quartz converts them into human readable format and structures them before saving the data into the local database.
Avaya CMS RT Socket Configuration
Avaya CMS RT Socket provides the real-time feed for agent, skill and VDN information. Each stream is sent through a separate TCP port. Avaya CMS initiates TCP connections to Comstice Quartz server using the destination ports configured below;
------------------------------- Session 2 -------------------------------
HOST2=comstice-quartz
PORT2=7001
ACD2=1
REPORT2=itnv_agent
DEST_APP2="Comstice Agent Feed"
------------------------------- Session 3 -------------------------------
HOST3=comstice-quartz
PORT3=7002
ACD3=1
REPORT3=tvi1
DEST_APP3="Comstice Split Feed"
------------------------------- Session 4 -------------------------------
HOST4=comstice-quartz
PORT4=7003
ACD4=1
REPORT4=itnv_vdn
DEST_APP4="Comstice VDN Feed"
Conclusion
Comstice Quartz Reporting offers great opportunities to understand the customer behavior and customer call patterns.Comstice Quartz can help to create many use cases for your business to efficiently run your customer service operations. Request a callback and a demo for more information.